Nginx is getting more and more market share every day. However, nginx is more than just a web server. Here you can find how to use it as an image server.
How often do you need to generate different sizes of images on your site or application? I need it almost every time. Unfortunately, image processing in PHP is a time and memory-consuming operation. So what are our options?
-
Develop custom image resizer in PHP
-
Integrate 3rd party PHP library (e.g: Intervention Image)
-
Deploy image manipulation app (e.g: Glide)
-
Use an external service (e.g: Cloudinary)
-
Use nginx on your server
Configure nginx as an image server
Nginx can manipulate images with the ngx_http_image_filter_module.
If you do not have this module enabled on your host, you should build from the source with the --with-http_image_filter_module configuration parameter.
Example configuration
server {
    server_name localhost;
    listen 80;

    location ~ "^/image-resizer/(?<width>\d+)/(?<path>.+)$" {
        alias /var/www/images/$path;

        #resize image without changing the ratio
        image_filter resize $width -;

        access_log off;
        expires 30d;
        add_header Cache-Control "public";
    }
}
Caching generated images
If you use the above configuration, your images will be cached on the client side but the requested image will be regenerated for every request. This is not something you would want to use your precious CPU time. To avoid regeneration, you can make your server cache the results.
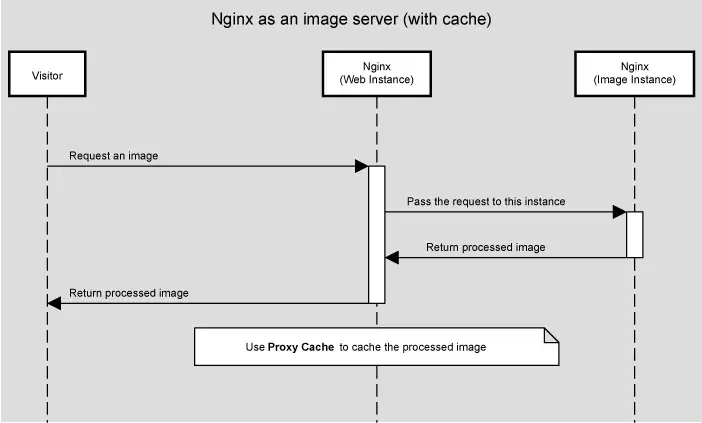
Nginx has a built-in caching mechanism but to use this cache, we need separate web and image servers. The web server redirects the request to the local image processing server and caches the result.
Configuration for web and image server (with cache)
In this scenario, you must create two server instances. The first instance will serve the usual web content.
# Web server
server {
listen 80;
server_name localhost;
root /var/www;
location ~ "^/image-server/(100|250|500|1000)/(.+)\.(jpg|png)$" {
# Pass the request to the local image processing server
proxy_pass http://localhost:8888;
# Cache the results
proxy_cache processed-images;
# Keep file in cache for 30 days
proxy_cache_valid 200 720h;
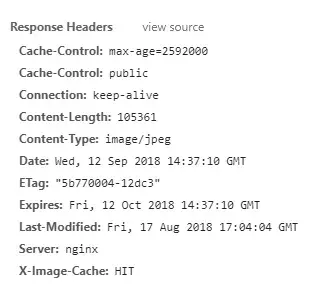
# Add cache status header (HIT, MISS, BYPASS, etc.)
add_header X-Image-Cache $upstream_cache_status;
# Let the client to cache the processed image
expires 30d;
add_header Cache-Control "public";
}
}The second instance will only serve the processed images. This instance should handle local requests.
# Local image processing server.
server {
  # listen on a different port
  listen 8888;
  server_name localhost;

  # This server is not public, so block other requests
  allow 127.0.0.1;
  deny all;

  # Get the parameters from the request
  # $width: Resize image to this width
  # $path: Original image file path
  location ~ "^/image-server/(?<width>\d+)/(?<path>.+)$" {
    # Use the original image
    alias /var/www/$path;

    # Resize image (ratio is preserved)
    image_filter resize $width -;
  }
}
Finally, to cache the results, we should define a new proxy cache in the http block.
You can use the example configuration below.
proxy_cache_path /tmp/processed-images/ levels=1:2 keys_zone=processed-images:10m inactive=240h max_size=1024m;Test the new configuration
To test the new configuration make the following request.
GET /image-server/1000/assets/images/image-0.jpg
You should get an image scaled to 1000px.